|
|
|
|
|
|
|
|
| Overview & Objectives: |
A storyboard visually tells the story of a video panel by panel, kind of like a comic book. Creating a storyboard ensures that you and your audience will understand your intent. After you have chosen your theme, this is the first step to understand what you are trying to communicate and what your intended message is.
What to look for
Storyboarding can save hours and hours of needless filming, editing and mixing. This in turn can save a production company millions and millions of dollars in the long run.
Your storyboard should convey some of the following information:
- What characters are in the frame, and how are they moving/standing/sitting?
- What are the characters saying to each other, if anything?
- How much time has passed between the last frame of the storyboard and the current frame?
- Where is the "camera" in the scene? Close or far away? Is the camera moving, panning?
In labeling each scene, use the Vocabulary terms to convey your meaning for the shot, movements, transitions, etc...
|
| Materials/Resources: |
Lesson Time - 150 minutes
Materials
- Adobe Premiere
- Digital Images
- Headphones
Resources
# of Participants
- This is a Group Assignment. You may work individually, or in groups of 2 to recieve credit.
Standards
- Students will be able to create a rough draft of a storyboard
- Students will be able to convey their ideas to paper
- Students will be able to work together as a team
- Students will be able to understand and know key terms related to video production
|
| Vocabulary: |
- Tilt
- Tip or lean camcorder up or down using tripod or holding camcorder.
- Fade
- Transition from scenes with black to scene (fade-in) or scene to black (fade-out).
- Storyboard
- Storyboards are graphic organizers such as a series of illustrations or images displayed in sequence for the purpose of pre-visualizing a motion picture, animation, motion graphic or interactive media sequence.
- CU
- Close Up is a certain feature, such as someone's head, takes up the whole frame.
- ECU
- Extreme close up - frames in face and cuts off forehead.
- Zoom
- Move closer into the scene from long shot to close up or vice versa.
- Pan
- Move camcorder from side to side.
- MCU
- Medium close up - takes three quarters of the person or object in frames.
- ELS
- Extreme long shot - wide angle of scene to get everyone or everything in shot.
- LS
- Long shot - to get most of the person(s) or object(s) in frame.
- Wide Angle Pan
- Pan from one end of scene slowly to other end which takes in all of scene.
|
| Warm-Up: Reflection (Hooks / Set) |
How many of you have ever read a comic book? Comic books are basically a very detailed storyboard, you follow along and it tells the story. (Show a comic book(s) for reference) Pass out some comics for students to glance over quickly to reference how a storyboard is constructed.
Show the short video about storyboarding basics.
Resources and Materials
|
| (Lecture) |
Show the short video about storyboarding Shrek.
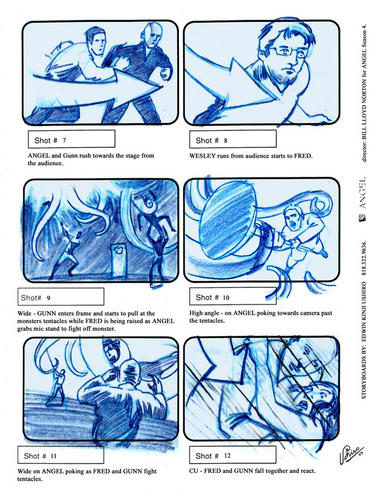
After the video, discuss the importance of storyboarding a video BEFORE beginning to film! Show the students the storyboard example and give to the groups to use as a reference.
A rough storyboard doesn't have to be high art - it's just a sketch. And it isn't written in stone - it's just a guide. You may very well change things after you go into the field to do your interviews and other reporting.
Students will now get into their groups.
Resources & Materials:
|
| (Group Work) |
In their groups, students will begin to create a visual outline of what their video will contain.
On a sheet of paper, sketch out what the main story page will look like and the elements it will include. Students should ask these questions within the group:
- What are the links to the other sections of the story?
- What's the menu or navigation scheme for accessing those sections?
- What multimedia elements do you want to include on the main page as the establishing visuals, whether video or pictures?
After they have a good idea of the direction of the video, they can begin to sketch out the ideas they just discussed.
If students are not artistic, they can use words to convey the scene. They should try to use even simple, basic stick-figures to show size and location of the characters in the scene.
Resources & Materials:
|
| (Checking for Understanding) |
Teacher should be walking around the classroom to ensure that the students/groups are correctly filling in the storyboard sheet.The groups should have at least 4-7 scenes drawn out either with sketches or writing or a combination of both, which is highly encouraged.
|
| (Assessment) |
Assessment Type(s): Writing Samples, Observations
Students will turn in their storyboard without telling the teacher what is about. The teacher should be able to determine what the film is about just from looking at the storyboard. If the teacher can, the students successfully completed the assignment. If not, students should go back and rework the storyboard to either be more detailed or rearrange scenes to make sense.
Teacher will observe the groups and they should have at least 4-7 scenes drawn out either with sketches or writing or a combination of both, which is highly encouraged - 15 pts
Students should have key vocabulary terms on their storyboard - 10 pts
Students should keep their storyboards neat and organized - 10 pts |
|
(Additional Resources) |
|
| Extra Tips: |
| Use www.dafont.com to download decorative fonts |
|
|
|
|
|
|
|
|
|
|
|
|