Twitter Facebook Youtube Return to home page
About Mr Coursey Courses Clubs and Organizations Social Media Students Tutorials- Contacts

Home > Courses > AAVP > 1st 6wks

DSLR Cameras & Lenses Lesson

 
Overview & Objectives:
add assignment description
Materials/Resources:

Materials

  • Adobe Premiere
  • Headphones

Resources

# of Participants

  • This is an individual Assignment, 1 person will recieve credit for work on this assignment.
Vocabulary: add vocabulary words related to the assignment
Lecture:

DSLR Camera Setting Notes

Aperture - Control the amount of blur or sharpness around your subject.

What it is and what it does: The aperture setting controls the size of the lens opening that allows light into your camera.You can blur the foreground and background that bracket your subject (known as shallow depth of field) by opening up the aperture with a low f-stop number; alternatively, you can keep your photo sharp from the foreground through to the background (known as wide depth of field) by closing the aperture down with a high f-stop number.

Shutter Speed - Show the movement of a fast moving subject or freeze it in action.

What it is and what it does: The only thing between the light that has passed through the Aperture and the image sensor is a shutter. The Shutter Speed setting controls how long the shutter opens to expose the image sensor to that light. Open it for just a millisecond and you can freeze a fast moving subject. Alternatively, you can show the movement of a fast moving subject by keeping it open longer with a slow shutter speed.

ISO - Sense the right amount of light for the visual effect you want.

What it is and what it does: With the ISO setting a camera's image sensor can be adjusted to detect more, or less light as needed for a good exposure. On a bright sunny day too much light hitting the sensor can cause an overexposure so make it less sensitive with a low ISO number. If your shooting conditions are dark the sensor needs to detect more light so increase its sensitivity with a higher ISO. High ISO will cause grainyness so as a rule use the lowest ISO possible. The photo effects you want to achieve with the aperture and shutter speed will impact the amount of light reaching the sensor, so use the ISO to adjust its sensitivity and get a good exposure.

Exposure Meter- Sanity check your settings.

What it is and what it does: The Exposure Meter is your final check before you snap a shot. At a glance it tells you how your exposure will turn out based on the Aperture, Shutter Speed and ISO settings. A well exposed shot lines up right down the centre at zero. An underexposed shot (too little light) falls left of centre and an overexposed shot (too much light) falls right of centre. Use the Exposure Meter as a guide only, exposure is a matter of personal preference so don't be affraid to wander off of zero.

The Canon 5i Settings

Light settings - Press ISO button on top of camera  (auto to 6400) choose the setting the best fits your lighting location.

Adjust Shutter speed - the shutter wheel is above ISO button. Spin Shutter wheel to the desired number. The higher the number, the darker the image. 

Check Aperture - aperture is top-right corner of LCD screen. Hold in AV button and spin the shutter speed wheel to the desired number. 

Set White Balance - White Balance is the measurement of Color on your camera. Press the Q button on the side of your screen. Scroll through to find your desired setting. Setting to custom will allow a full color filter to your image. 

  • Cloudy- add a yellowish hue to the image synthesizing the natural light of the sun during an overcast day.
  • Fluorescent Light Lumination - for shooting in doors
  • Auto - color might be off according to your light source (may have greenish tint)

Focus - after you set the Exposure

  • Press the zoom in Button for a close up on your subjects eye. turn the lense until the eye is clearly in focus. Press the zoom button until it zooms back out. This generally leaves your frame in good focus.

DUE DATE: Check Skyward for current DUE DATE

Video Tutorials:
For more videos, check out the Mr. Coursey's Classroom YouTube Channel
Click on the Video Title in the video to view the Tutorial in its own window at a larger size.
 
CAMERA BASICS!

Canon Rebel T5i: Beginner's Tutorial
CAMERA BASICS 2

Video Production: DSLR Camera Overview

What LENS should YOU BUY?!

What Are Prime, Zoom, Fix Aperture, Variable Aperture Lenses | Photography 101 Lenses
 
Glossary:
Below are some words to know
 

Exposure

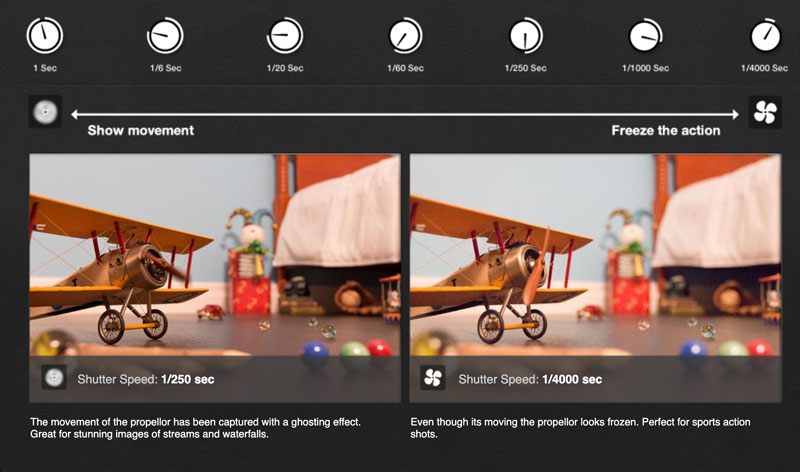
The quantity, duration and intensity of light captured by the image sensor. Exposure is controlled by three elements: ISO, Aperture and Shutter Speed

Shutter Speed

The feature that controls how long the shutter is open for and therefore how much light comes into the camera and hits the image sensor.

Noise or Digital Noise

The appearance of colour dots or specks (sometimes called grain), often pronounced in shadows and darks areas.
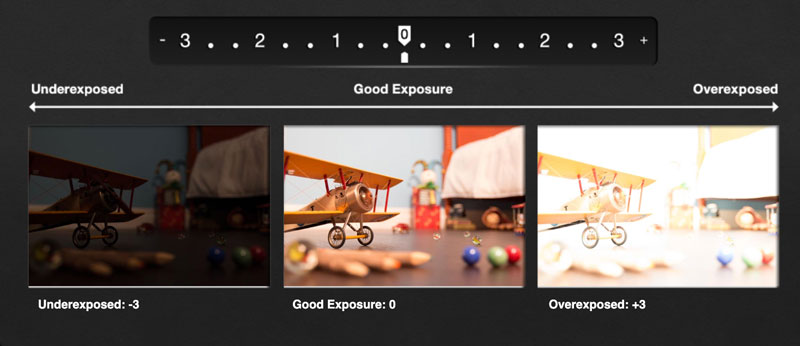
Overexposed

A condition in which too much light reaches the sensor, making it look too light or washed out.

Av

Aperture value, identifies Aperture Priority Mode

Aperture Priority

An exposure mode that lets you set the aperture while the camera determines the shutter speed for proper exposure. If you change the aperture, or the light level changes, the shutter speed changes automatically.
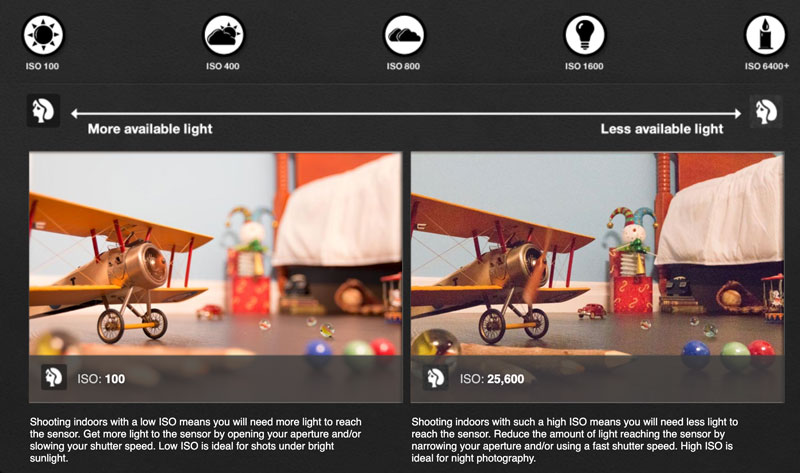
ISO

The feature that controls the sensitivity of the image sensor in your camera. Low ISO is not very sensitive and good for sunny days when you don’t need a lot of light captured. At a high ISO means your image sensor is more sensitive when you need a lot of light – this is good for shooting in low light.

Stops

Stop can refer to different settings in any of the three elements that control Exposure. Aperture, Shutter Speed, and ISO settings are all divided up into "stops", even though the numbering systems are different.

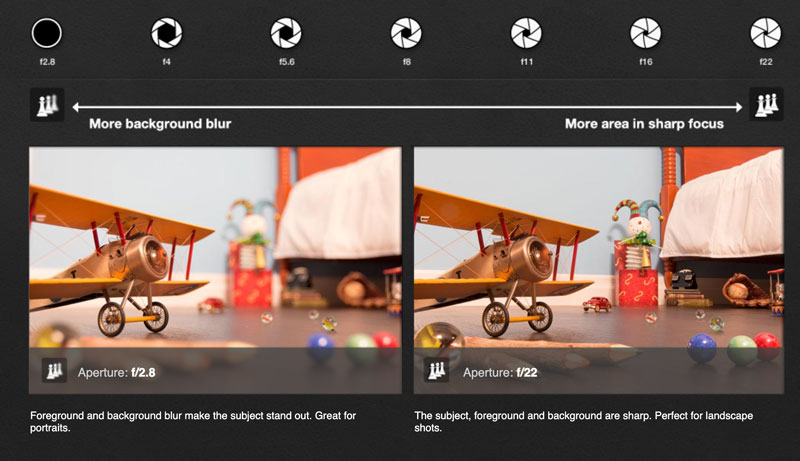
Depth of Field (DOF)

The zone of sharpness in front of, and behind, the subject on which the lens is focused. Depth-of-Field (DOF) is affected by Aperture. A low aperture value will give you a very shallow or short depth of field – so the foreground and background which bracket your area of focus will be blurred. A wider or longer DOF can be achieved by a higher Aperture setting. This will bring more of the area bracketing your subject into focus.

Shutter Priority

An exposure mode that lets you select the desired shutter speed while the camera determines the aperture for proper exposure.
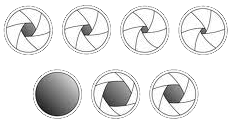
Aperture

The feature that controls the size of the lens opening when a picture is taken. If you need a lot of light you want to have a big opening (a low aperture). Measured in F-stops and often referred to as such.

F-stop (see aperture)

Technically refers to the numbers that represent the size of your lens opening. A low number gives you a large lens opening. A high number gives you a smaller lens opening.

Underexposed

A condition in which not enough light reaches the image, making it look dark.

Tv

Time value, identifies Shutter Priority Mode

Saturation

The percentage of hue in a colour. Saturated colours are called vivid, strong, or deep. Desaturated colours are called dull, weak, or washed out.

 
Directions for turning work in:

Save as period_lastnamei_asssignmentname.mp4 (1a_smithj_lighthouse.mp4) in your 1-6wks folder and upload a copy to Google Classroom.

If you are turning in a file as a group project save as (2a_lastnamei1-lastnamei2-lastnamei3_assignmentname.mp4)

Extra Tips:

TIP There are two Priority Modes on your camera that can help make shooting easier while still having some control over the exposure of your image. When you’re shooting in a priority mode you decide which exposure setting you want to control – Aperture or Shutter Speed, while the camera can automatically adjust the others to ensure a good exposure.

TIP When in Aperture Priority mode keep in mind that when you use a small Aperture, the Shutter Speed will adjust to stay open longer. Long shutter times will pick-up any hand movement so use a tripod.

TIP Shutter Priority Mode (represented by Tv), allows you to focus on how motion is being captured, while automatically setting your Aperture and ISO. So if you’re shooting a track meet or a car race, you will probably want to use Shutter Priority.

TIP Think of Aperture and Shutter Speed as balanced variables. If your settings are giving you a good exposure but you want to increase the size of your Aperture by one stop (or click) - you will also need to decrease your shutter speed by one stop to get the same balanced exposure.

TIP Remember that using a very high ISO may add some digital noise. So always start with a low ISO and adjust if necessary to achieve the effect you want.

TIP When taking pictures, just remember the following: ISO affects Noise, Aperture affects Depth-of-Field (DOF), Shutter affects Motion.

TIP Be aware that a longer Shutter Speed will show any movement from your hand. Try steadying your camera or using a tripod.

TIP Remember that sometimes natural light gives you the most beautiful results.

TIP By adjusting your exposure settings you can capture amazing moments in low light and bright light.

TIP On a bright sunny day using a smaller aperture and short shutter speed may get you a good exposure.

TIP Shooting a scene with low light is going to need a larger aperture and/or a longer shutter speed. Remember to steady the camera if you are using a longer shutter speed.


Calendar


Club/Organization News
TSA Logo
National TSA Website
MHS TSA

TSA Nationals
Nashville, TN

June 27-July 1, 2020

BPA Logo
National BPA Website
MHS BPA

BPA Nationals
Washington, D.C
.
May 6-10, 2020

Questions, comments, and technical issues regarding Mr. Coursey's Classroom website content should be referred to:  Donny Coursey, Webmaster
Copyright © 1999-2020 Mr. Coursey's Classroom. All rights reserved.
This page was last updated on August 22, 2019